In order to log in to the ELD portal please make sure that you enter the correct URL.
To log in, simply enter your username and password and click on Login:
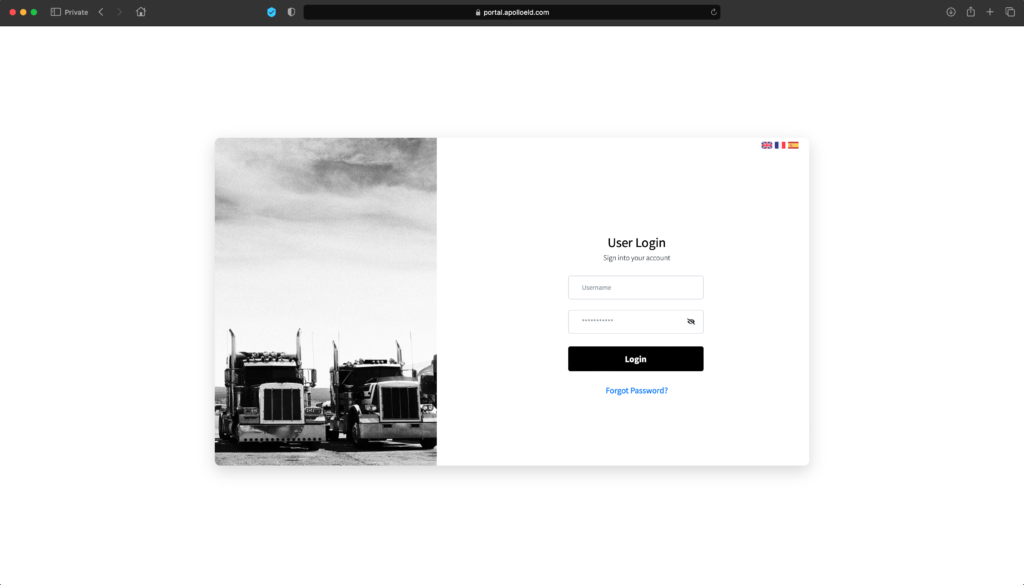
If you forget your password, please click on the Forgot Password button. Enter your username and click on send. An e-mail will be sent to the e-mail address you have specified on your user profile.


The first tab inside the Apollo portal is the Manage tab. With this tab you can:
- Edit carrier information
- Add drivers
- Configure drivers
- Enable and disable drivers
- Add home bases
- Assign drivers to home bases
- Create assets like trucks or trailers
- Configure notifications (i.e., vehicle inspections with defects or driver violations)
Carrier
Use the dropdown menu to select the Carrier and then click on the first button under ACTIONS to edit your carrier information:
![]()
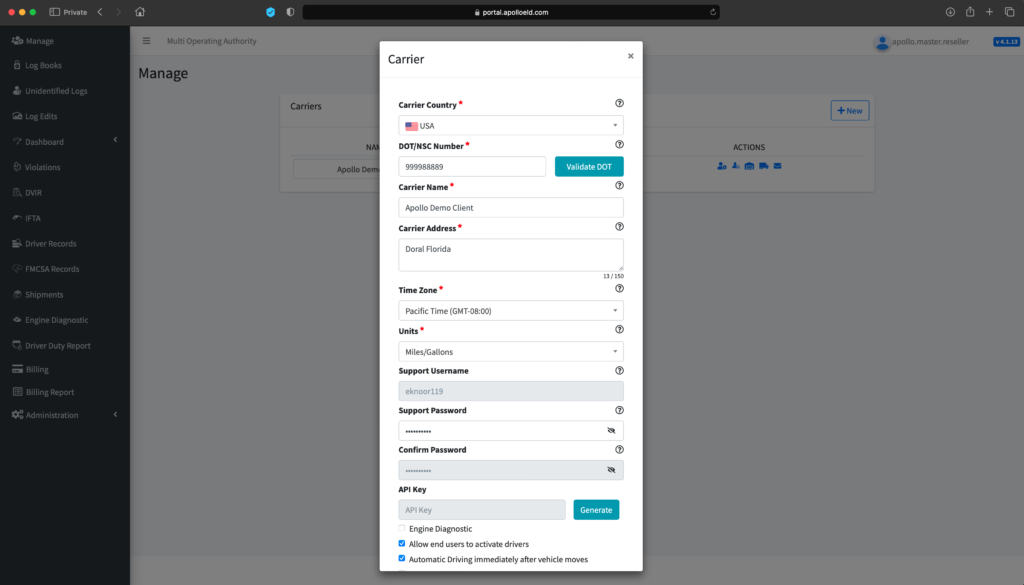
DOT/NSC Number: Enter your USDOT or NSC number here.
Verify your DOT number by clicking the Validate DOT button. If the system can locate the DOT number in the database, it will display the associated carrier’s name and address. By verifying this information, the carrier name and address will automatically populate in the fields mentioned below.
Carrier Name: Enter your company name
Carrier Address: Enter your primary business address here
Time Zone: Use the dropdown menu to specify your home terminal time zone
Units: Use the dropdown menu to select desired units of measure
Support Username and Password: You can define a support username and password to be used by your support personnel to configure an ELD
Account Level Options: There are different options you can enable or disable based on your preferences. Use the checkboxes to toggle these features on or off
- Engine Diagnostic: Enables DTC codes or engine diagnostics
- Automatic driving immediately after the vehicle moves: This option allows you to transition to automatic driving just 1-3 seconds after the vehicle starts moving. If you disable this option, then there is a one mile radius where the ELD can move and it will not trigger automatic driving. Please remember that to be compliant this option must remain enabled
- Force asset/ECM device connection: Forces the ELD to connect only to the ECM devices defined in the portal. If you disable this option you are allowing your drivers to scan and select any ECM device nearby the ELD
- Drivers must use portal assets list: Forces the ELD and the driver to only select a tractor or trailer that has been previously defined on the portal. By enabling this option drivers are not allowed to create a new vehicle. If you disable this option drivers can create and enter their own vehicle or trailer information directly in the application
Please do not forget to click on the Save button after making modifications!
Drivers
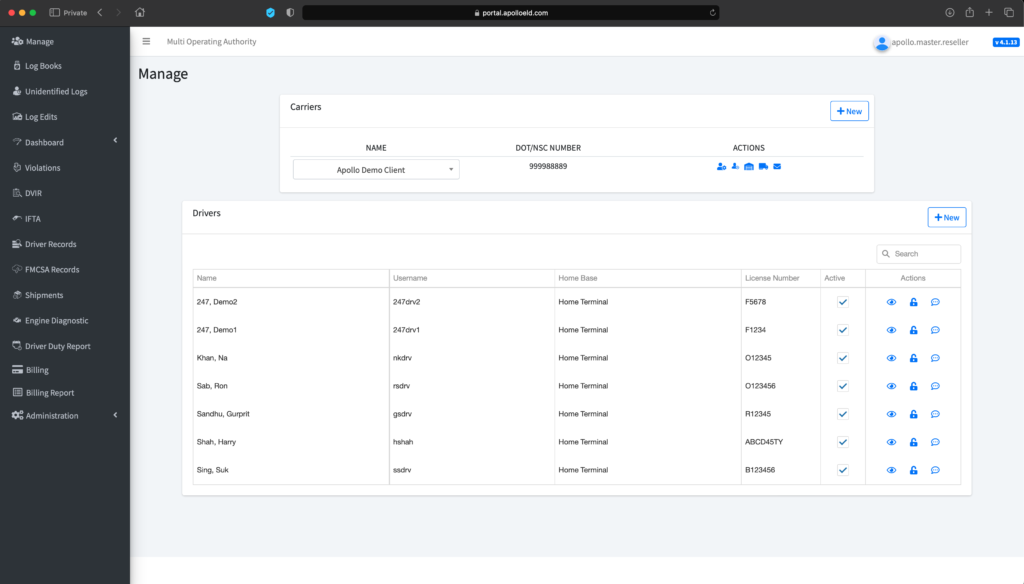
The next button on the ACTIONS menu of the Manage tab is the Drivers button.
![]() Here you can manage all your driver settings including:
Here you can manage all your driver settings including:
Enable or disable drivers: If you need to temporarily deactivate a driver, click on the checkbox under the Active column for the specific driver. If you don’t make any changes you can reactivate the same driver by enabling the checkbox.
Unlock Drivers: In a situation where a driver cannot access the ELD device they are currently logged into, the ELD system will not allow that driver to log into a different device. For the driver to do so, you will need to click on the Unlock icon and unlock the driver’s profile so they can then log in on a different device.
Send Notification: If you need to send a quick notification message to a driver, click the button. On the Notification popup window, enter the Title and body of the message. Click Send Notification to send the message. This message will be delivered only if the driver is currently locked on the ELD.
![]()
Configure Driver Details
To configure a new driver or modify a driver’s current configuration, click on the button. Here are the options for configuring a driver:
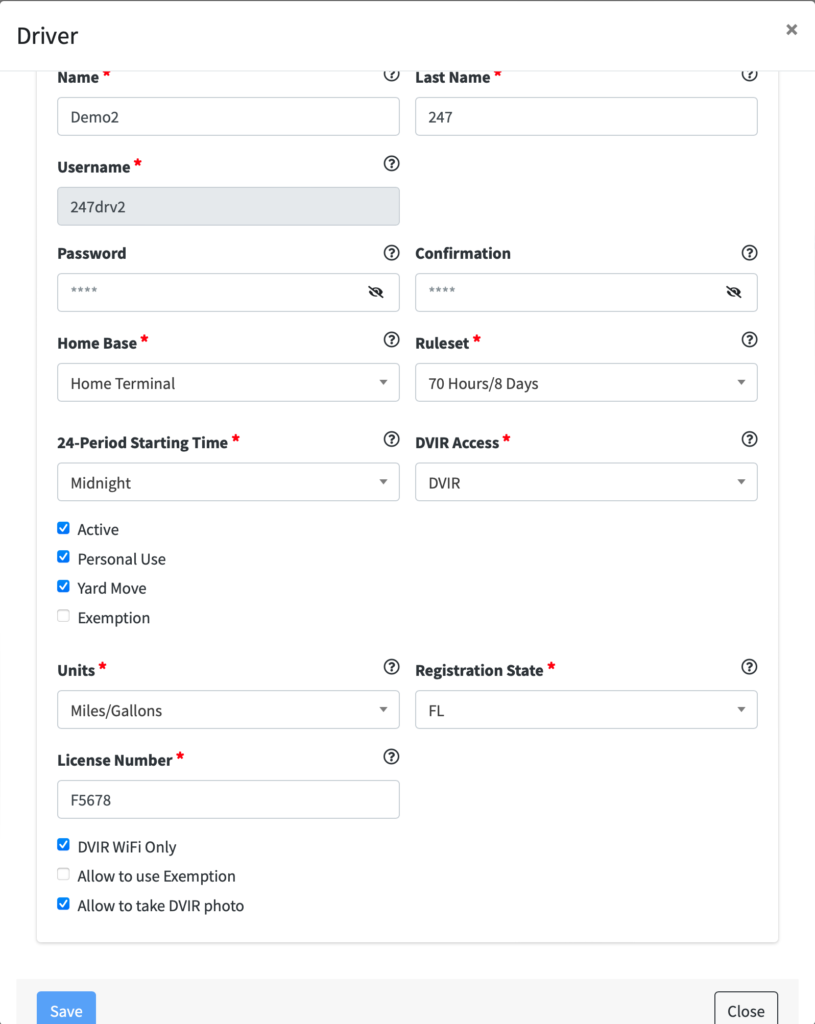
![]()
Name: Enter driver first name
Last Name: Enter driver last name
Username: Assign a unique Username for the driver to use to login to the ELD application (*Note that the Username cannot be updated later*)
Password: Set the driver password to login to the ELD application
Home Base: Select the driver’s home base
Ruleset: Select the driver’s ruleset from the dropdown menu. If a driver later changes the ruleset directly on the app, this will update the server and it will be changed accordingly.
24-Period Starting Time: Select the default start time of day to be used on the driver’s logs
DVIR Access: There are three different settings for vehicle inspections:
- DVIR provides full access to the vehicle inspection function
- No DVIR will completely remove the vehicle inspection function from the mobile app
- DVIR Only requires a different application (mostly used by mechanics). This only provides access to the vehicle inspection functions without access to ELD-related functionality.
Active checkbox: Uncheck to deactivate driver access
Personal Use checkbox: Check to allow driver to use Personal Use (personal conveyance)
Yard Moves checkbox: Check to allow driver to use Yard Moves
Exemption checkbox: When selected, this indicates the driver is fully exempt from Hours of Service rules (i.e., a mechanic who occasionally drives the vehicle to perform road tests). Once selected, you can choose from a preset list of exemptions or enter a custom reason for the exemption
Units: Use the dropdown menu to select desired units of measure for the driver on their application
License Number and Registration State: Enter the driver’s license number as well as the registration state
Additional Driver Configuration Options: There are three additional options to configure a driver:
- When enabled, DVIR Wi-Fi only means that images taken during a vehicle inspection are only uploaded to the server when the ELD is connected to a Wi-Fi network.
- When enabled, Allow to use exemption lets the driver indicate when they are under an exemption and input the information related to that exemption directly on the ELD.
- When enabled, Allow to take DVIR photo permits drivers to take pictures while performing vehicle inspections.
Please do not forget to click on the Save button after making modifications!
Home Bases
The third button on the Manage tab is the Home Bases button. Here you can create home bases and assign drivers to them.
![]()
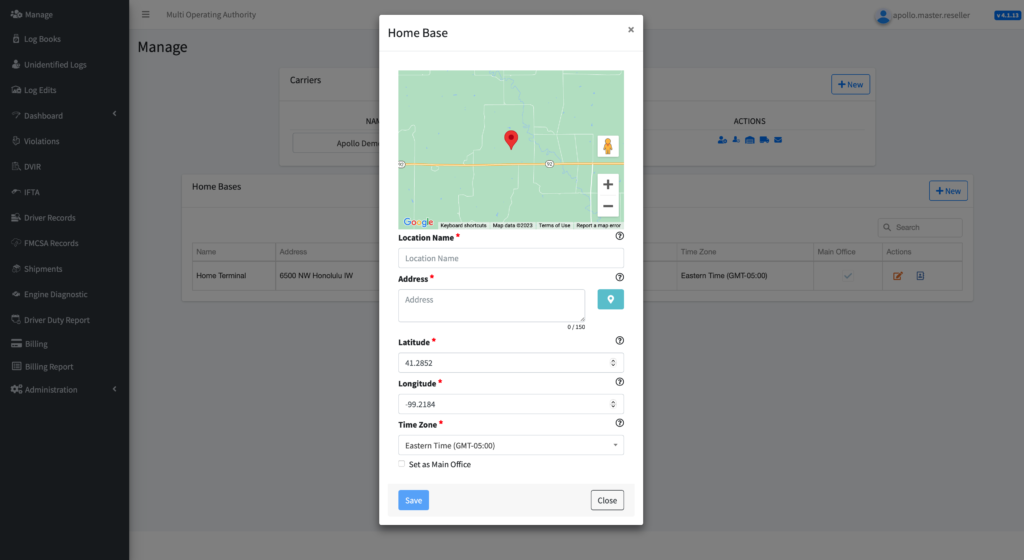
To create a home base:
1. Click on New button
2. Enter the Location Name
3. Input the full Address and click on the location pin icon to verify this location on the map.
4. Specify the Time Zone for this location
5. Check Set as Main Office if this Home Base is your primary location
6. Click Save once the information has been input.
To assign existing drivers to this home base, click on the icon next to the Home Base under the Actions menu. Search for the drivers you wish to add and click on the Assignment checkbox to assign them to this home base. Click Save to complete the assignment.
![]()
Assets
Click on the small blue truck icon under ACTIONS to manage your assets.
![]()
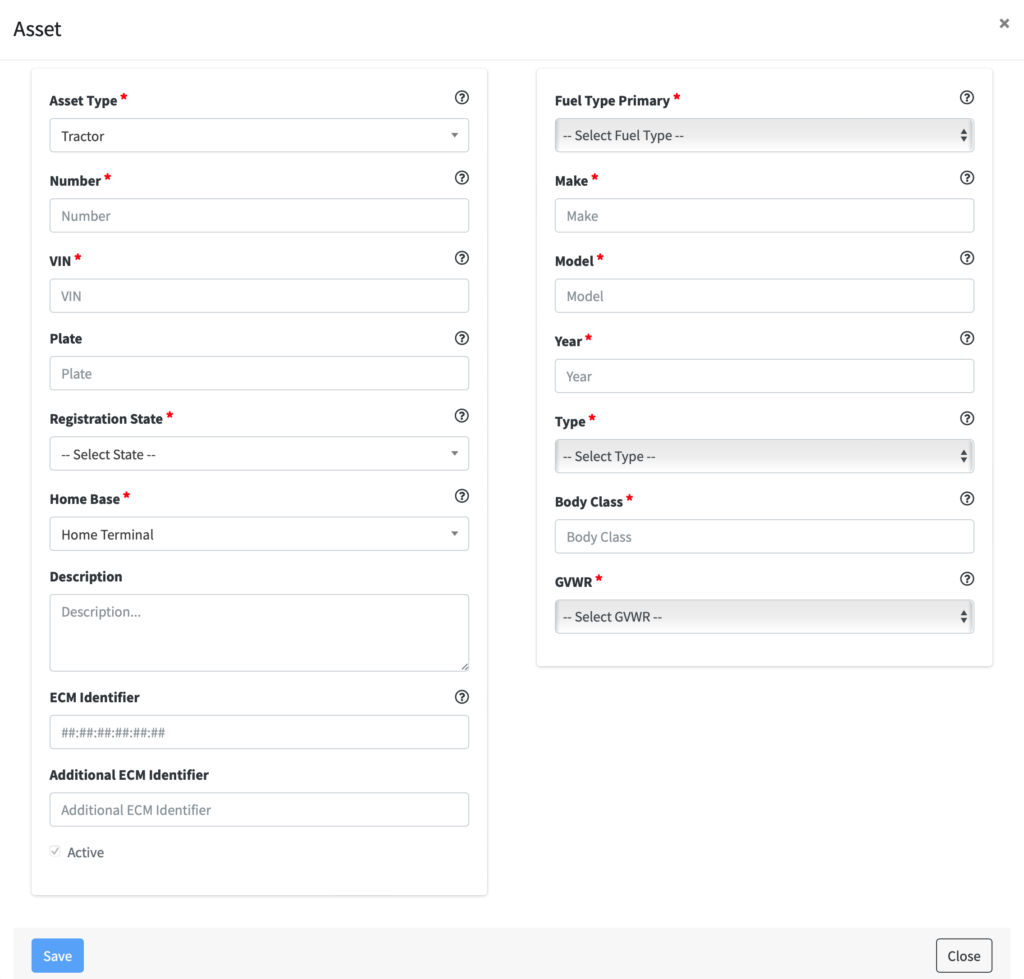
Click on New to add a new tractor or trailer asset and input the following:
Asset Type: Select the type of asset: tractor (vehicle) or trailer
Number: Input a name or number for the asset
VIN: Enter the FULL 17 digit VIN. Once the VIN number is entered, the system will check a public domain database to get detailed information about the vehicle such as fuel type, make and model, year, etc. This information will later be used on the enhanced IFTA module.
Plate: Enter the license plate number
Registration State: Use the dropdown menu to select the license plate registration state
Home Base: Use the dropdown to assign the asset to a home base
Description: Optionally, you may add a description of the asset
ECM Identifier: This refers to the ECM device’s MAC address. If the Force Asset/ ECM-device connection feature is enabled on the account, the vehicle will only be able to connect to the ECM device with the defined MAC address.
Additional ECM Identifier: Optionally, you may use this field for additional information regarding this vehicle’s ECM device. For example, you can input the device’s serial number or any other type of ID that makes it easier for you to document which device is installed to which vehicle.
Please do not forget to click the Save button when you’re finished!
Notifications
The final option under ACTIONS is the Notifications button.
![]()
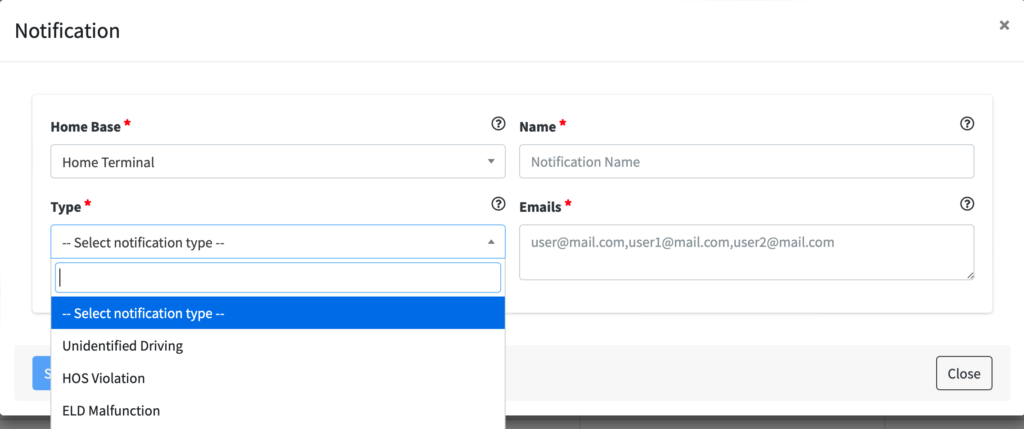
Click the New button to create a new notification:
Home Base: Select the home base to which the notification applies
Name: Create a name for the new notification
Emails: Enter the email addresses of all individuals who should receive this notification.
Note that if inputting multiple addresses they must be formatted exactly as in the example text: “name1@email.com,name2@email.com,name3@email.com”
Type: Use the dropdown to select the type of notification. The system supports the following types of notifications:
- Unidentified Driving: Triggered when a vehicle moves and a driver is not logged into the ELD
- HOS Violation: Triggered whenever a driver has exceeded any of the allowed times for the shift, cycle or drive time
- ELD Malfunction: Triggered when an ELD is not functioning properly.
- Driving without engine data: Triggered when a driver switches to the driving status but is not connected to the ECM device installed on the vehicle
- DVIR Non- Compliance
- Special Moves: Triggered when a driver uses personal use or yard moves
- No PRE-TI before: Triggered if a driver moves the vehicle without having performed a vehicle inspection at beginning of shift
- Rejected Carrier Edit: Triggered when a driver rejects a carrier-proposed edit to the driver’s logs

![]()
The ELD portal is certified compliant with both the US and Canadian ELD regulations.
Export Log Records:
Export Print-Display Logs in PDF format
Export ELD Data File in CSV format, OR directly transfer to U.S. or Canadian agency
To export the ELD data file to FMCSA.
Select USA on the Region dropdown menu.
Select the driver whose logs you wish to transfer
- Execute the logbook
- Click on Export ELD Data File
- Select the date range in question
- Enter the routing code provided by enforcement into the Comment field
- Select Export to FMCSA on the Action dropdown
- Click on Export. If the export process completed without issues, you will receive a submission ID. Please write it down and share it with the auditor if needed. If errors occurred during the export process, you will see the exact description of the error, which will give you a chance to make changes and try to export the ELD data file again.
Follow the same process as above to export the ELD data file to a Canadian agency, EXCEPT first select Canada under the Region dropdown

View Log Records:
1. Use the Region dropdown menu to pick the country you want to see this information for. A log can be viewed in either region regardless of where the vehicle actually traveled. This just impacts the type of information shown based on each region’s regulation requirements.
2. Search for a Driver by entering first or last name or username
3. Select the Date for the log records you wish to view
4. Click on Execute to see the Driver’s Daily Log records displayed on screen
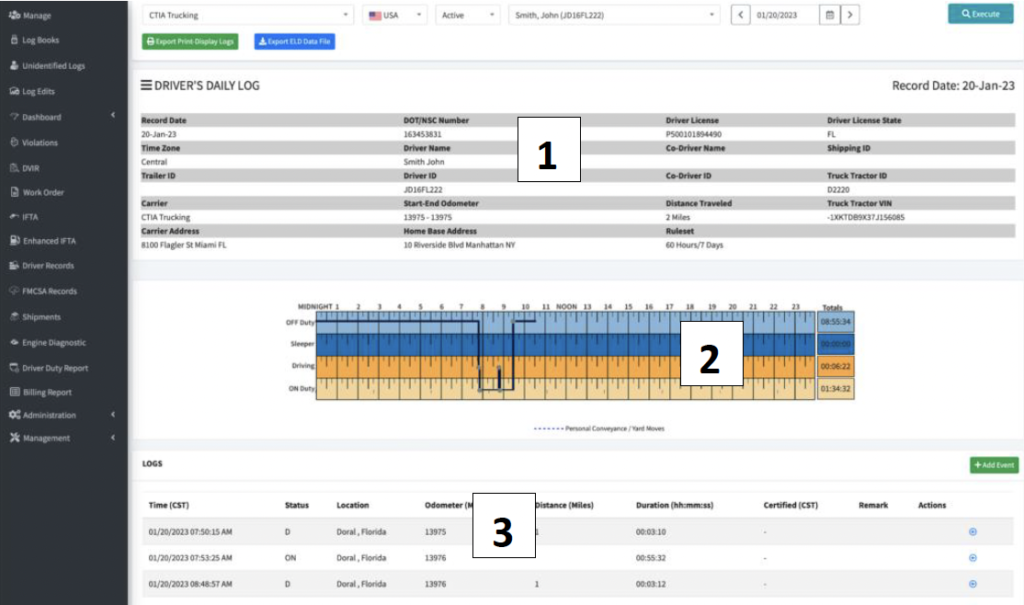
Log Header: Includes general information about the carrier, driver, co-driver, vehicle and trailer, and shipment(s). Total distance is displayed as a calculated value using the difference between Start and End Odometer values for that date.
- Graph Grid: Visually displays all duty status changes and total time in each status for the given 24-hour period
- Special driving categories of Personal Use (personal conveyance) and Yard Moves will show plotted with a dotted blue line
- If a driver was operating under an exemption for a specified time period, the graph will show that period plotted with a dotted red line.
- Log Event Details: All log events for the 24-hour period are listed here with all required data elements for each event.
- Certified column: Will indicate whether the driver has certified this event
- Remark column: Will display any remarks associated with each event
- Actions column: Will allow you to either add a remark or edit/ delete a specific log event (if allowed)
Considerations for Editing Log Events in the Portal:
- To edit an event in the Portal, it must first be certified by the driver. If it is not certified, the edit and delete buttons will not be available.
- The current duty status of a driver cannot be edited
- You cannot add the same duty status twice in a row. For instance, if you have a transition from an Off Duty status to an On Duty status and now need to add a status in between the two, the new status cannot be Off Duty nor On Duty. The best option here is to edit the start time of either event as needed.
- The start date and time are the best parameters to modify on an existing duty status
- Automatically recorded driving time cannot be shortened in any way as per ELD regulations. Consider adding a Remark to explain mistake or incidental Driving time
- The timestamp for an automatically generated driving event cannot be changed
- Keep in mind that if you remove a duty status you are increasing the duration of the previous duty status
- Once an edit is made on the admin portal it is sent to the driver for approval on the application. The driver can then accept or reject the edit. If accepted, it will go into effect on the logs.
How to Create Carrier Proposed Log Edits from the Portal:
1. To edit a specific log event, click on the blue pencil icon next to that event ![]()
2. On the Edit Log pop up, click the dropdown to change the duty Status. Only the duty statuses that are allowed under each specific scenario will be available.
3. Use the Date and Time fields to adjust the start time of the event
4. Use the Location field to edit the location of the log event if needed
5. Input a Remark or comment explaining the edited entry
6. Click Save
This change is called a Carrier Proposed Log Edit. This proposed change will be shared with the driver, who can decide to reject or assume the carrier proposed log edit. Specific information regarding carrier proposed edits can be seen under the Log Edits menu option.

You can easily find any unidentified driving time by going to the Unidentified Logs menu option.
Searching for Unidentified Logs: Here you have the option to filter your search for Unidentified Logs by Status (Inactive or Assumed), Vehicle, or Start-End Date
We recommend setting the Status to inactive, selecting all vehicles, and selecting the desired start and end date. Click Execute to run the report. You will now see every unidentified driving event that has not yet been assumed by a driver, as well as the timestamp and associated tractor number. With this information, you can now go back to the Vehicle dropdown, select that specific vehicle, and run the report again.
Assigning Unidentified Logs: Now you can add annotations or assign the driving time to a specific driver. Please keep in mind that the drivers own their logs, and once you have assigned an unidentified driving record to a driver on the portal it will then be up to them to assume or reject it via the application before it is applied to their logs.


You can quickly check the status of carrier proposed edits by going to the Log Edits tab.
Searching/Filtering Proposed Log Edits:
1. Use the Drivers dropdown menu to select All drivers or search and select a specific driver
2. Use the Start-End Date to set a range of dates to search
3. Use the Status dropdown to filter by rejected, assumed, or recently requested carrier proposed edits.
• Requested: This log edit has not been reviewed by the driver yet and/ or is pending approval or rejection
• Assumed: The driver accepted the change
• Rejected: The driver denied the change and a new carrier-proposed edit must be done if you want to propose a new change again.
4. Click Execute
5. On the result screen, you can see the driver’s name, the tractor number, the timestamp for the underlying log event and the timestamp when the carrier proposed change was made. Both the original duty status and the requested new duty status will show as well
6. Sort search results by clicking on the column headers


The ELD portal has two different dashboards.
Compliance dashboard: Shows different metrics to help you run your business
- Number of shipments you currently have in transit
- Percentage of your ELD devices that are compliant (devices without malfunctions and that are in compliance with regulations)
- Number of unassigned driving events for the last 30 days
- Number of HOS violations in the last 30 days – This number should be as close to zero as possible
- Hours of Service Compliance graph shows you all the different violations that you have in the last 30 days. On the top right you can filter by violation type
- Roadside Vehicle Inspections (DVIR) graph shows vehicle inspections (DVIRs) performed in the last 30 days. You can see how many of them were compliant, you can also see how many had defects and if they were resolved or not
- Driver Certified Records chart shows you the proportion of certified log records in your system. If a significant portion are Not Certified, you should instruct your drivers to certify them as soon as possible.

Hours of Service Dashboard: Shows all your drivers’ statuses as of the most recent ELD device check-in, including the following information:
- Current Ruleset driver is using
- Remaining time left for Driving, Shift and Cycle limits, as well as time remaining until 30 minute break (if applicable)
- GREEN remaining time means driver has more than 1 hour remaining
- YELLOW remaining time means under 1 hour remaining until violation
- RED remaining time means under 30 minutes remaining until violation or a violation has occurred
- Last Duty Status
- Last Location
- Time of the most recent update/ELD device check-in
You don’t have to refresh or execute the report again as it will refresh automatically every few seconds.
You can also sort the list by clicking on any given column header.


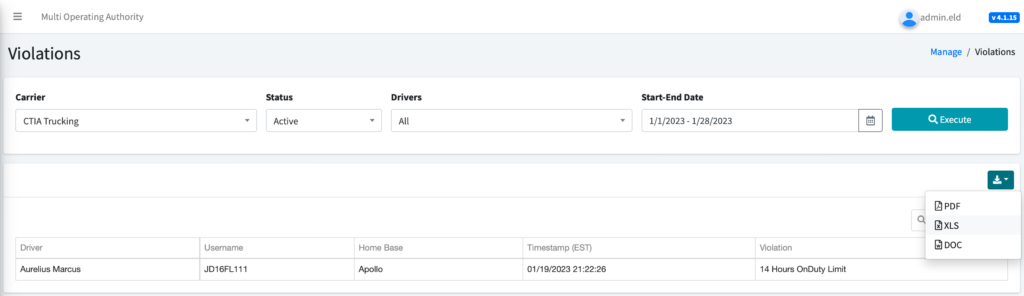
The Violations report lets you run a query to see all hours of service violations committed during a period of time. Search for violations by Driver and Start-End Date and click Execute to view results. The report shows the Driver’s name, Username, the Timestamp when the violation was triggered, and the reason for the violation.
You can also export the violation report to PDF, Excel or Word by clicking on the Download button ![]()
The DVIR module helps you run a report to review the Driver Vehicle Inspection Reports (DVIRs) completed by your drivers.
- Use the Drivers dropdown to select All drivers or a specific driver
- Use Start-End Date to select a date range
- Click on Execute to pull search results
Additionally, you also have More filters if you want to be more specific on your search:
- Tractor number
- Trailer number
- Vehicle condition For DVIR
- Reports made in the US or Canada/ Type of Report
- Specific defects
Actions shown next to each search result will allow you to download the DVIR report, either with or without pictures (if available):

The DVIR module is compliant with current regulations. It features a 3-signature process to address defects: The driver identifying the defect, a mechanic involved in fixing the defect, and, upon the return of the vehicle back to the fleet, a new driver or administrator performing a vehicle inspection. This final step requires the last person to sign and close the three-signature loop indicating that all the defects were fixed, and the vehicle is ready for operation.
If you opted for the Work Order module, which is an enhanced vehicle inspection solution, you would also be able to select a defect (or group of defects) and share this information with different external organizations (i.e., a mechanic shop). Once you send that invitation out to the desired organizations, they can pick this job and communicate with you about it via the Portal. They will be able to ask you questions and send quotations, and you can accept or deny offers. This is an ongoing process that is finished once the defect has been fixed and you have paid for the work order. You can cancel any work order at any time.

The international fuel tax agreement (IFTA) feature allows you to run monthly or quarterly IFTA reports to export to different agencies. The report will show you the total mileage and fuel gallons paid within each different jurisdiction of the US and Canada. You can filter the report by Year, Quarter or Month time periods and by Vehicle. You just need to input the fuel tax rate for each jurisdiction and Recalculate the report. At the end you can click on Download and use the downloaded PDF file to share with the corresponding agency. You can also add or delete jurisdictions accordingly.

If you subscribed to the Enhanced IFTA report, additional tools are included to make this process a lot easier. With the Enhanced IFTA report you don’t need to find the fuel tax rate for each of the jurisdictions and the corresponding time period. This is automatically recorded in the system when you add a new vehicle. The system uses the VIN number to search a public domain DOT database to find specifics about this vehicle (including the fuel type). With the fuel type, the system can use a different public domain database to find the fuel tax rate for that type of fuel for each specific month of the year. This automated process can save you many hours of time!
With the Enhanced IFTA report you can also make adjustments over time. The system will save these adjustments so that at the end of the quarter you will be able to see all previous adjustments made to your IFTA report. You can run the report including or excluding toll miles. The Enhanced IFTA tool also allows you to calculate distance based on a route in case you are missing trips.

To add an adjustment just click on the Adjustment button:


At the end of the quarter just click on Download IFTA Report:
- Select a Month
- Enter an address for the Origin Place and Destination Place
- Click Calculate Mileage to view mileage by state results. You can edit the mileage per state and the quantity of fuel purchased
- Click on Save Adjustments
The Driver Records report gives you a full insight of everything that’s happened on any ELD for a chosen timeframe, including driver login/logouts and any ELD data diagnostic or malfunction.
To run the report:
- Select a Driver from the dropdown
- Select a date range on Start-End Date
- You can also optionally filter by Event Origin, Type and Code
The Driver Records report gives you a full insight of everything that’s happened on any ELD for a chosen timeframe, including driver login/logouts and any ELD data diagnostic or malfunction.
To run the report:
- Click Execute to view search results. Information is sorted by date and the time when the record was created. Alternatively you can click on any column header to re-sort the results based on that criteria

Example 1: Searching for unidentified driving time assumed by a driver
1. Select the specific driver from the Drivers dropdown
2. Select a Start-End Date
3. Select option #4, assumed from unidentified driver, on the Event Origin dropdown
4. Execute the report
You can see the ELD ID where the driving time was generated, the app version, the time when the driving time was generated, and the vehicle name.

Example 2: Understanding why the Logbook doesn’t show engine hours and accumulated driving distance
1. Select the Driver
2. Select a Start-End Date
3. On the Event Type select item number 7, malfunctions and diagnostics
4. For Event Code select malfunction logged
5. Execute the report
6. Check for odometer and engine hour recordings and diagnostic events

Additional information:
Event Status:
- “Active”: This record is currently active and will show on the driver’s Logbook and ELD data file export
- “Inactive-Change”: This record was deactivated by the driver directly on the ELD app during a log edit and will not appear on the driver’s Logbook. However, it is always included on the ELD Data File during export
- “Inactive-Change Requested”: The carrier proposed this record by editing a log on the ELD Portal
- “Inactive-Change Rejected”: This record is inactive as a result of a carrier-proposed edit that was rejected by the driver. This record will not appear on the driver’s logbook, but it is always included on the ELD Data File during export
Event Origin:
- “Automatically Recorded”: This event is generated automatically by the ELD without driver interaction. Examples of this type of event include automatic driving, intermediate log events recorded every 60 minutes while the vehicle is moving, malfunctions, and more
- “Edited or Entered by Driver”: This is an event manually created by a driver
- “Edit Requested by other than Driver”: This type of event is usually a carrier-proposed log edit assumed or rejected by a driver
- “Assumed from Unidentified Driver Profile”: This event origin refers to Driving and On Duty events automatically generated by the ELD while no drivers were logged into the app, and which have then been assigned and assumed by the driver
Event Type:
- “A change in driver duty status”
- “An intermediate log”: Log check-in events triggered every 60 minutes while the vehicle is moving
- “Personal Use or Yard Moves”
- “Driver’s certification”: This event shows log certifications performed by drivers for previous days’ logs
- “Driver’s login/logoff”
- “Engine On/Off”: This event is generated when the RPMs on the vehicle exceed 300 (engine on) or decrease under 300 (engine off)
- “Malfunction/Diagnostic”: This event is created when the ELD fails to operate as required by regulations
- “Off-duty time deferral”: This event applies to Canadian operation only and is generated when a driver decides to defer up to 2 hours of Off Duty time for the next day
- “A change in driver’s cycle”: A driver operating in Canada changed cycles between 70 hours in 7 days or 120 hours in 14 days
- “A change in operating zone”: A driver changed operating zones between Canada South, Canada North, US or Alaska
- “Additional hours not recorded”: N/A
List of Diagnostics and Malfunctions:
Diagnostics:
1- Power Data/Compliance Diagnostic (ECM parameters must be available within 1 minute of powering the vehicle’s engine on)
Resolution: Make sure you are connected to the ECM device. On the menu, go to Scan Devices and select your ECM device. Make sure all engine parameters pass the diagnostics (all green)
2- Engine Synchronization Data Diagnostic (not all ECM parameters are available when the ELD records an event e.g. duty status change)
Resolution: Make sure you are connected to the ECM device. On the menu, go to Scan Devices and select your ECM device. Make sure the diagnostic passes all engine parameters (all green)
3- Missing Required Data Elements Data Diagnostic (other required data e.g., location/coordinates not available when recording an event)
Resolution: Make sure the GPS module is enabled on your ELD
4- Data Transfer Data Diagnostic (An ELD must verify this functionality at least once every 7 days)
Resolution: Verify that you have an active cellular or Wi-Fi connection at all times. Confirm that your logs are always updated on the ELD portal
5- Unidentified Driving Records Data Diagnostic (more than 30 minutes of driving without a driver logged on the ELD)
Resolution: You are not logged on the ELD and the vehicle moves for an extended period. Please log in and select your Driving time
6- Other ELD identified Diagnostic (ELD provider may implement additional, technology-specific malfunction and data diagnostic detection schemes)
Malfunctions:
Most malfunctions relate to a Diagnostic, but a malfunction is generated when the same diagnostic occurs for at least 30 minutes in the last 24 hours:
P- Power Compliance (related to diagnostic)
E- Engine Synchronization Compliance (related to diagnostic 2, for instance multiple periods of no ECM data that, when added together, are more than 30 minutes in the last 24 hours)
T- Timing Compliance (the timestamp on the ELD compared to an external time source are different)
Resolution: Make sure the date and time on your mobile device is properly set. DO NOT manually change the date or the time on your ELD
L- Positioning Compliance (no location available, related to diagnostic
R- Data Recording Compliance (monitor storage capability to store records)
Resolution: Make sure you have sufficient internal storage on your ELD. Delete files if necessary
S- Data Transfer Compliance (ELD records not able to be uploaded)
Resolution: You probably do not have internet access. Restart the ELD (if needed) and confirm you reconnect to the network
The FMCSA Records tab provides you a report of every ELD data file sent to FMCSA or inspection agency. It shows you the exact date and time when the file was sent, the Submission ID assigned by FMCSA and the reply that came back from FMCSA. Click on the specific Message Count hyperlink to see details of the transfer. This will show you errors which you can correct and resend to FMCSA.

An ELD requires a Shipping Document number or the Shipper Name with the Commodity being transferred.

Drivers can create shipments directly on the ELD app or shipments can also be created here in the Portal. Input the following info when creating a shipment:
- Estimated Pickup time (required)
- Estimated Delivery time (required)
- Shipper Name (name of company or entity shipping the goods)
- Shipment Number (the shipping document or BOL number)
- Commodity being shipped
- Select the Driver delivering the shipment: With this you are assigning the shipment to this specific driver
Shipment information can be shared with external organizations by entering the Pickup and/or Delivery information. Fill in the destination Email address for the shipper and/or receiver to share with them a link to this shipment. Warehouse personnel can make updates (like estimated arrival time, bay assignment, recommended parking, etc.) which are sent in a matter of seconds to the driver via the application and updated on the Portal.
Please follow this diagram to understand the communication flow:

If you opted for the Engine Diagnostics module (aka, DTC codes) you can run a report for each one of your vehicles to show the full fault code information (including FMI detailed information).
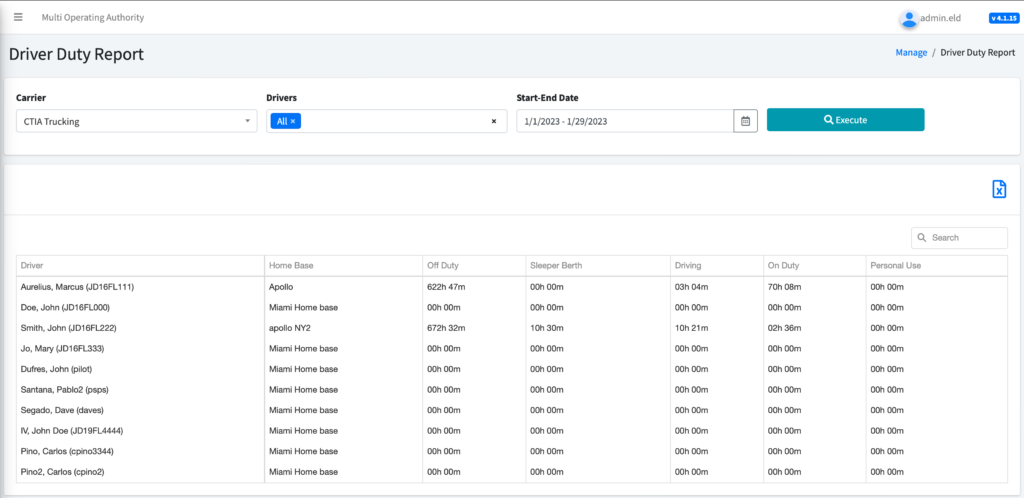
The Driver Duty Report is mostly used as a timesheet. Select Driver(s) and a Start-End Date. Then click Execute to see the total time spent by each driver in On Duty, Off Duty, Sleeper, Driving and Personal Use. You can download this information in an excel format by clicking the Download button.
![]()

Roles
If you have a master carrier account, you can create Roles to limit access to the different areas inside the portal.
As an example, let’s say you want to provide access to a group of mechanics who take care of your fleet and DVIR defects. You don’t want this type of user to be able to see Logbooks, unidentified logs, violations, IFTA, and such information. You can create a new role to assign them to, disable all unnecessary features, and assign DVIR access only. Do not forget to click Save.

You can now create a user profile to be assigned to this new Mechanic Role and when this user logs into the portal they will only have access to DVIR and carrier information.
Users
